Showing posts with label COMPOSTING. Show all posts

Growing in the Shade


Not everyone is blessed with open space, plenty of sunlight and perfect soil.  If you're one of the 'unlucky' ones but still yearn to have a robust garden, this post is for you.

Let's start off with the soil.  In our nearly 30 years of gardening, we have never tested the soil. Perhaps that was to our determent but I don't believe so.  Our gardens typically produce well without any intervention except the following;
  • Properly till the garden area with either a shovel, pitch fork or rototiller.  You want the soil to be loose so plant roots have the freedom to take hold and prosper. Not everyone believes in tilling, but we found it to not only be beneficial but makes planting easier.
  • Adding leaves in the Fall.  They will break down over the winter and be ready to till into the soil in the Spring.  Gardener's Supply Company explains "Leaves are packed with trace minerals that trees draw up from deep in the soil.  When added to your garden, leaves feed earthworms and beneficial microbes.  They lighten heavy soils and help sandy soils retain moisture".
  • Compost.  We compost year round.  It's either put into the compost pile or directly into the garden.
  • Rotate plants every year or every other year.  Wikipedia puts it very simply; "Crop rotation is the practive of growing a series of dissimilar or different types of crops in the same area in sequenced seasons.  It help in reducing soil erosion and increases soil fertility and crop yield."  What the means is don't put your tomato plants in the same place every year.  Change it up and reap the benefits.
  • Our best weed fighter is grass!  Take your clippings and put them right in the garden. We pile it up in between the rows.  Be sure NOT to directly cover any plants, it will kill them. Another bonus, you're adding nutrients that can be tilled into the soil every year. I would however caution you, if you use chemicals on your grass, don't use it in your garden.  If your goal is growing heirloom or organic fruits and vegetables, then adding chemically treated grass will defeat your efforts.


Let's talk about shade and determining what you have and will be able to grow.  Penn State Extension has a guidance on determining your specific conditions.  Here are the basics:
  • Heavy shade; no direct sunlight reaches the ground (such as under dense evergreen trees).
  • Moderate shade; mostly reflected light (such as a typical hardwood forest).
  • Light shade; there is partially filtered sun (such as under birch trees).
Finally, you will need to determine just what type of shade you have; Heavy, Moderate or Light. Take a few days to note where the sun reaches and for how long.  Once you have an area chosen and determine how many hours of sun vs. shade it gets, you're ready to plant.  ALWAYS keep in mind, gardens are temperamental, not everything grows when or how it's supposed to.  Most successful gardens go through several years of experimentation.


I agree, you don't have a whole lot of options when dealing with shade, but you do have some and that's always better than none.

If you'd like to research more before diving in, check out these additional, informative posts.

Mother Earth News:  40 Gardening Tips to Maximize Your Garden
Smiling Gardener:  Checklist for Growing Nutrient-Dense Organic Food
Penn State Extention:  Vegetable Planting and Transplanting Guide
Planet Natural:  Vegetable Gardening Tips and Tricks
Gardener's Supply Company:  Vegetable Gardening for Beginners


Now that you've harvested your garden, it's time to enjoy!  There are a wide variety of recipes on our Pinterest Boards; choose the right one for you.


Worth the Effort or Waste of Time?


Let's start with the benefits of pumpkin....
  • AIDS VISION; a cup of cooked, mashed pumpkin contains more than 200% of the recommended daily of Vitamin A, carotenoids and beta-carotene.
  • LOW CALORIE; 3 grams per cup of pumpkin is only 49 fiber rich calories.
  • REDUCED CHOLESTEROL; Pumpkin Seeds are naturally rich in phytosterols which may help reduce LDL levels and tryptophan which has shown to improve moods.
  • REFUEL A TIRED BODY; one cup of cooked pumpkin has up to 564 milligrams of potassium.
  • VITAMIN C; upwards of 11 milligrams can be found in one cup of cooked pumpkin.


Benefits of Pumpkin

Wouldn't you agree that it IS worth the effort and time commitment?  I would.  Yes, you can buy a can of it at the store, even get the organic, I have.  However, if I have the opportunity and time to make my own, I always take that option.  I'd prefer the only processing of my puree to be my Kitchen stove and a glass jar and not a commercial processing facility.

Ok, enough of that, on to making your own puree:

You can use any pumpkin but I prefer "milk pumpkins" or also known as "sugar pumpkins".
They are lighter in color than what you normally see.

Give them a good scrubbing.

Cut open the pumpkin and scoop out the innards.
You can either compost or save the seeds and roast them.

Slice into chunks that will fit into your pot, cover with water and boil until soft.  Depending on how big your pumpkin is and how much fits in the pot, it can take up to 30 minutes or longer to soften.


Remove sections from the pot, BE CAREFUL, the pieces will be very hot, let them cool a few minutes.  Use a spoon to scrape the pulp from the skin (the skin goes in the compost too). 

This is the undrained pulp from one large pumpkin.

Using a colander, let the pulp drain until most of your water is out and give it a stir every now and then. This takes quite a while, up to 2 hours in most cases.

This is what drained from one of my pumpkins, nearly 7 cups of water!
As you can see, draining the pulp is important.

You're done!  It's probably taken all day BUT well worth the effort in my book.
What I see here is 9 pumpkin pies to be made any time I want!


A few tips:

I normally do this on a weekend.  I'll get everything cut up, boiled and draining started then go about my day, passing by every so often to give it a stir.

Any pumpkin works but Sugar Pumpkins have a nice taste which I prefer for recipes.

If you like your pies a little rustic like me, there's no need to do anything further after draining. If you like it smoother use either a potato masher, blender or immersion blender to achieve the desired consistency.

I use a mesh strainer and cheesecloth only because I find it easier to clean up.  Any small-holed strainer will do.

Store puree in the freezer in freezer-safe jars, BPA-free plastic containers or Ziploc Bags, removing as much air as possible.  I prefer the glass jars since they are reusable and easy to clean. When you're ready to defrost, put it back into a collander while you prepare your recipe.  A little more water will drain from being frozen.

You CANNOT safely can pumpkin puree either with a Pressure Canner or Water Bath Canning.  There is no safe way, other than freezing, for long term storage.

You CAN Pressure Can pumpkin chunks.

You can find my favorite Pumpkin Pie recipe here.  I've been making the same recipe for over 20 years and it's perfect every time.


If I were to buy 9 fresh pumpkin pies at a bakery, it would cost me $20 per pie.  Yep, 20 bucks!   

The pumpkin cost me $6 so that's 67 CENTS per pie plus another $2 for ingredients.  Total $2.67 for homemade, nutrient-rich pumpkin pie.

To me that's worth the effort.  Wondering if it's worth your time and effort?


Try it.  Compare a pie made with your fresh puree and another with canned.  I promise you'll be shocked at the taste.  And if not, well, you learned something new, you have a few jars of puree and a good story to tell.


Don't just carve your pumpkins . . . Eat them!

https://www.pinterest.com/homesteadingins/healthy-pumpkin-recipes/
Pumpkin is one of my favorites and recipes that include fresh pumpkin are even better.  You can easily substitue fresh pumpkin for canned.  If you need to use canned, be sure you're getting JUST pumpkin with nothing added.  Using canned pumpkin with additives such as sugar, will change the taste of your recipe quite a bit.

Pumpkin Butter, like Apple Butter, is tops in our house.  We use it every day for PB&J sandwiches; that's Pumpkin Butter & Jelly!  Check out Oh She Glows simple recipe.

Pumpkin Pancakes, oh yeah, they're perfect for Breakfast, Lunch or Dinner in my book.  Mom, What's for Dinner recipe is flavorful and delicious.  If you don't have Buttermilk on hand, don't worry, Emeril's recipe is super simple to make and I use it all the time.

Pumpkin Turkey Chili sounded, well if I'm going to be honest, not so good.  I made this two weeks ago and I will attest to it's deliciousness.  Honestly, you really can't taste the pumpkin but you reap all the healthy benefits of it being in the recipe.

Pumpkin Risotto, put together in about 15 minutes, is the perfect compliment to the Chili. Southern Inlaw has an easy to follow recipe I think you'll really enjoy.

Pumpkin Pie finishes the meal with perfection.  Once you find your favorite, you won't stray, this is mine...
Click to Enlarge
Making fresh Pumpkin Puree is best from sugar pumpkins (or "milk" pumpkins as we call them here in Northern New Jersey).  They tend to be small, about the size of a smooshed medium watermelon and a light, creamy orange.  It's well worth the effort and typically you can get 2 or 3 pies from 1 pumpkin.

There are plenty of sites with instructions for making pumpkin puree; these are mine;  Scrub the whole sugar pumpkin before cutting, then cut into large slices.  Discard the stem. Bring a large pot to boil and cook until the rinds are soft.  Carefully remove the slices from the water, scrape off the pumpkin, discard the rind (be sure to compost it), and drain the pulp for an hour or so. Draining depends on how much you have.  You don't want to be able to squeeze out any water. It doesn't have to be bone dry, just as dry as you can get it. You're now ready to use the pulp in any recipe that calls for fresh or canned pumpkin.

https://www.pinterest.com/homesteadingins/healthy-pumpkin-recipes/
If you love pumpkin as much as we do, check out our Pinterest Board, Healthy Pumpkin Recipes to find your favorite.

You might also enjoy our Apple Harvest board with over 650 pins of great Breakfast, Lunch and Dinner recipes, along with some adult crafts.  Let's face it, why should the kids have all the fun!


Wondering if all this is worth the trouble?  The answer is an emphatic YES!  The health benefits of pumpkin are quite amazing. Vitamin A, Fiber, Amino Acids and Potassium to name a few.  It's also easily available at most grocery stores, however, if you have the opportunity to make your own fresh puree, go for it, you won't be disappointed.

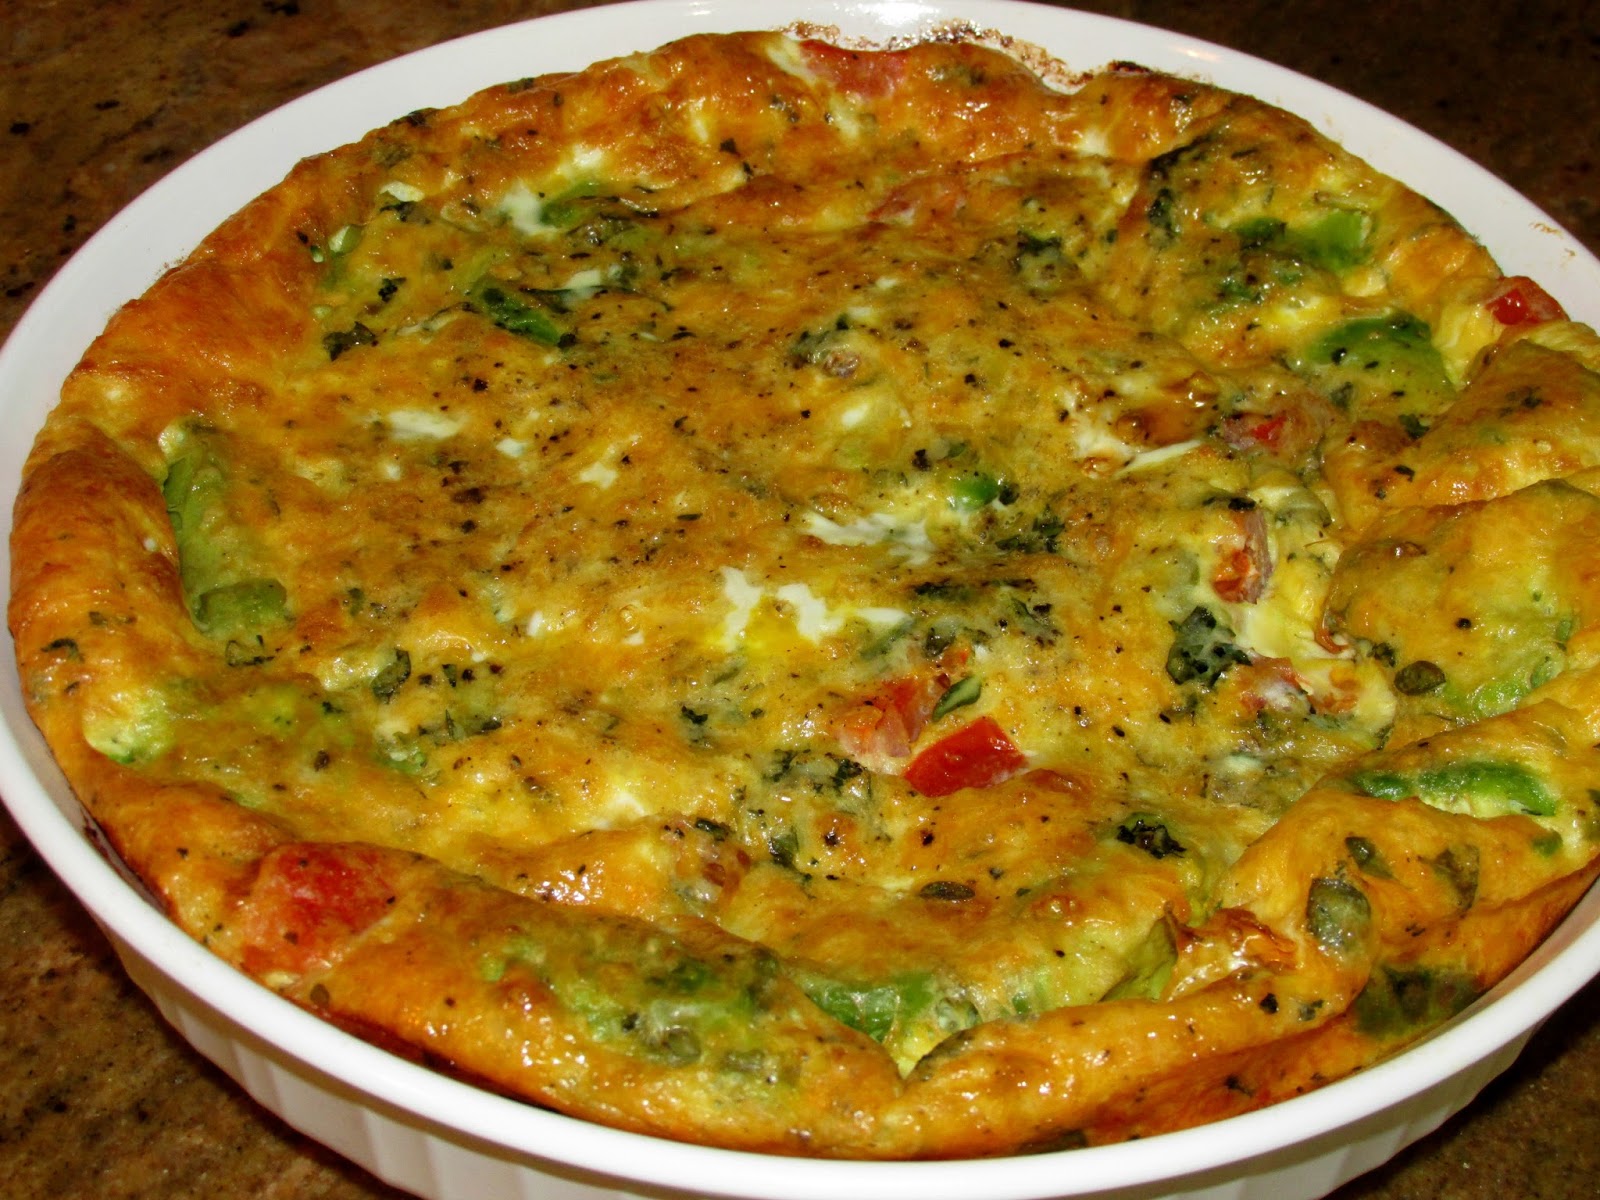
Quiche Simplified

Quiche, such an exotic word.  Sounds complicated doesn't it...baking a Quiche.  Well, it doesn't have to be complicated at all!  This is my very simple, very uncomplicated, very basic Quiche recipe.

Tomato, Avocado, Herbs


Mix together 8-10 eggs, 1-2 cups cheese, 1/2 cup milk and a pinch each of salt and pepper.

Yep, that's it.  Now, if you want to make it a little more complicated, add

1 chopped, fresh tomato
1 chopped, fresh avocado
1/2 cup or more Fresh Herbs

You can increase or decrease these ingredients to your liking.
The more filling you add, the lessor amount of eggs you'll need.  
Keep in mind you should always have a minimum of 8 eggs.

Here's how to build it...

Preheat oven to 350
Grease dish with butter (I prefer ceramic dishes).
Add filling ingredients.
Pour egg mixture on top of filling.  Pat down any areas that are not covered by the egg mixture.
Bake for 30-45 minutes, depending on your oven.

That's it!  You're done!  Quiche Simplified.  Quiche is subjective -  you can add any of your favorite fillings to the basic recipe, or none at all.  It can be as simple or as complicated as you want.
If the knife comes out clean, it's done!


From my Garden
Thai Basil, Basil, 


I use a TON of fresh herbs, mainly from my garden.  I found this awesome little herb grinder, AR+Cook in HomeGoods.  Put the herbs in, push down and twist the top.  Nicely chopped herbs come out the bottom!  I'll admit, I spend alot of time in the Kitchen and I do love my gadgets!


A+R Fresh Herb Mill


Composting Made Easy

Composting really is so simple.  There are dozens of sites telling you how to set up a compost area, layering materials, getting proper oxygenation; the details are endless. I'm here to tell you, based on over 25 years experience, that none of that is necessary!


Stainless is your best option

Start in the Kitchen with a compost pail.  DON'T buy a plastic pail, it WILL hold odors and smell after just a couple of months. And there's no need to buy anything fancy or complicated.  I found this stainless steel bucket in the Target clearance for $7 and had an extra pot lid at home.  If you're not that lucky, you can still get a stainless bucket and lid for under $20.  Stainless will never hold smells and cleans up easily.  We eat alot of fresh food so ours is emptied 1-2 times a week.


Almost everything is compostable
Put your kitchen scraps in the bucket.  Yep, it's that easy.  If you can throw scraps in the garbage, you can just as easily throw them in a bucket.  Everything goes in EXCEPT meat, eggs, dairy items, fish, bones.  Here's a great comprehensive list to use as a guideline from Planet Tea.


There are several ways to use your compost.  We have a one large compost area in our backyard where kitchen waste is mixed with 'greens' such as leaves, sticks and grass.  We simply add them when we cut the grass or rake the leaves.  We also dump directly into the garden.  If you don't have the space, you can purchase a Compost Tumbler. I will admit, I don't have experience with Tumblers so you'll need to research that as far as getting it started.

Dump scraps right into the garden
If you're new to composting, be patient.  It will eventually come naturally and you will find yourself freaking out if someone throws valuable compost waste into the garbage instead of the pail!

Also if you're new, be prepared to wait a full year before you can utilize your compost (a Tumbler may be quicker. HOWEVER, once your compost area is established, you will have nutrient rich soil to work with!  Yes, soil.   There's no need to start new areas each year, simply continue to add scraps.  Now that the area is established, adding scraps just adds to the nutrients and breaks down faster.

Mix scraps with 'greens' in a pile


What can you do with all that awesome, chemical free compost?  Use it in gardens, planting beds, and indoor/outdoor potted plants.  We put most of ours in the garden; fruits and vegetables grow beautifully in nutrient rich, chemical free compost dirt.


To sum it up...

  1. Get a stainless steel bucket with lid.  The lid should have an air hole.
  2. Put scraps in the bucket.  Use this list from Plant Tea as a starting guideline.
  3. Empty scraps into your pile or tumbler at least once per week.
  4. Add 'green' waste whenever you have it.
  5. Turn your compost pile whenever you add greens.
  6. Use your nutrient rich, chemical free compost soil!

What to do with all those Strawberry tops?!


Picking 2 big baskets of strawberries leads to 1 big bowl of strawberry tops!  That lemon is leftover from the strawberry pie.

I recently read a post about using the tops as an additive to water for great flavor.  Since I don't like to waste anything, I figured it was worth trying - really, what did we have to lose?


Turns out, IT'S AWESOME!  You should try it!

I am a Homesteader...and I live in Suburban New Jersey

Anniversary weekend at
1922 Starkey House in upstate NY
I have to say, I never thought of my self as a "Homesteader". Images of run down shacks on the outskirts of Alaska come to mind when I hear of homesteading. However, the more I learn about it, the more I come to realize this has been our way of life for nearly 20 years!

Being married over 25 years to an avid hunter, gardener, composter, landscaper and outdoorsman (to name just a few) has taught me alot. It was my stepping stone, WAY BACK in 1988, to a life of homesteading. A life I didn't realize I would become a part of and love every minute of it!

We're just a regular Suburban family. We live in a beautiful town in a beautiful 3 acre home filled with DIY projects, surrounded by awesome neighbors (no, they are not 20 miles away lol) and yes, the grocery store is 10 minutes away and a huge mall is just 20 minutes down Route 15! To look at us you'd think we were just like everyone else.

But we're not.

High School Sweethearts
25+ years later
We exclusively eat venison (no chemically processed beef for us!), have gardens, grind flour, bake from scratch, DIY, use only what we need, recycle manically, shop Farmer's Markets and Trader Joe's as much as we can.  Now Trader Joe's IS at least 40 minutes from here but so worth the trip AND I get to visit my sister! 

We are not crushed by debt but live by our means and do without when necessary.  We've had some really GREAT times and some really AWFUL ones too.

We have three beautiful sons who are learning right along with us but still have complete freedom to become their own persons (One would be considered a Hipster, one is an artist and one is a total techie nut). We've been called hippies, crunchy, even bitchy (I can get on a tangent about healthy eating).

We've essentially cured asthma and gastritis through nutrition. By essentially I mean no more pneumonia episodes or nebulizers. No day and night pills for gastritis. Not one of us has had the flu in years. In fact, we RARELY get sick at all. All through changes in our nutrition habits.

My Beautiful Boys


I hope you find this Blog interesting and helpful. I'm happy to answer questions if I can. Remember, Google search is your friend.  Talk to your local farmers, they are a wealth of information.  Seek out like-minded people to get yourself started or continue your journey. 

You will never know it all....E-V-E-R-Y D-A-Y is an opportunity to learn something new!